(Note: I'm working on this page and making changes. If you've visited this page before you should "reload/ refresh" the page to see the current version.)
If you've slogged through my previous pages on eccentric / multi-centers turning you have an idea of how I've been trying to come up with a graphical method of visualizing results from pairs of centers. If not, here's a sample of "seeing" the turnable vs "shadow" areas of a blank.

Though this approach worked well enough, there were still a lot of unpredictables.
Then I recieved the Fall 2007 issue of American Woodturner, put out by the American Association of Woodturners. Barbara Dill's five page, well written, well organized and well illustrated article, the first of two on Multi-Axis Turning, was like having The Rosetta Stone decoded. She spent a year coming up with a method of categorizing, illustrating and explaining the How & Why of multi-axis turning - that I could understand - and - "SEE" - or begin to see more clearly.
Just glancing through the article was an "AH!" thing. The clouds parted, trumpets blared, angels sang - and the sun shone brightly. I'd been wandering around in the fog, randomly exploring multi-axis turning - and suddenly - the fog was lifted. I had glimpses of distant possibilities - along with paths to get to them.
I'd been thinking in terms of completely turned areas - ALL Circular Cross Sections. Then I saw one of the illustrations in Barbara's article that caused a forehead slapping - DUH! .
ARCS!
Intersecting ARCS!
I don't HAVE TO turn all the way to a Circular Cross Section! I CAN turn Intersecting Arcs - two pairs produce an oval cross section (actually a "lens" not an oval), three produce a triangular cross section, four a rectangular cross section, etc..

AND the arcs didn't HAVE TO have the same radius!

Barbara's article also changed HOW I think about multi-axis turning in another way. Prior to her article I was focusing on the centers on the ends. Now I'm thinking in terms of resulting cross sections along the piece.
Thanks to this article I now can play WAY outside The Box - or more accurately - I can play way outside The Circle. It was like going from a 2-D world into a 3-D world.
Freedom from "round" - oh the possibilities!
Off to the shop, cut some 3/4 x 3/4 x 5" maple blanks - mark the center and add one on either side of center, out near the edge of the blank. Repeat on the other end and start playing with ARCS. In no time at all I had the three pieces shown in the photo below. OK - so only the left one is just intersecting arcs - the others are variations. I have trouble focusing on just one thing at a time. Notice that the middle one? Will get to that in just a bit - please be patient.

In Photos Set 1, on the left, you have two intersecting arcs which form a lense shaped cross section ( ) to the turning. The sides of the lense are straight AND parallel. (The piece on the right uses almost circular cross sections - using diagonal centers. The middle one - well there's an interesting twist to that one. I'll get to that one - in just a bit).
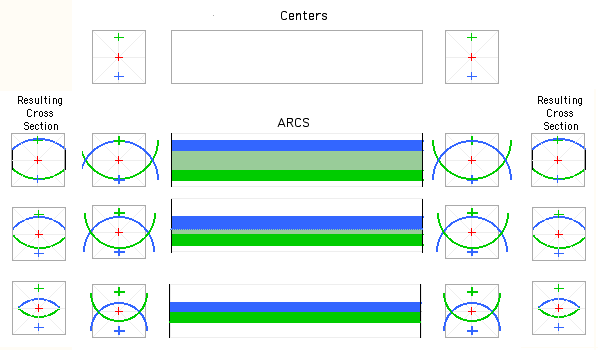
Now I'm a Visual Learner - give me a spoken or written description / explanation and I'll eventually get IT. But I'll get IT a lot quicker, and understand IT better if you show me. Give me illustrations and diagrams - the simpler the better. So here's one way of illustrating the simplest of the Two Arcs from two pairs of centers idea. Mount the blank between the Green Centers and turn an arc down the piece, then repeat the process with the piece mounted between the Blue Centers. I used a 1/2" roughing gouge with the "corners" ground back a little so they're less apt to "catch" when cutting the transition from square to round.

When you're trying to "see" curved shapes, the standard "End View - Top View - End View" drawing is adequate to convey an idea. But when you throw in curves , what in drafting is called an Isometric View is handy. Add a twist and an Isometric View is essentail.


