BUT FIRST (groan) - a suggestion. Make your adjustments in "Half the Distance" increments and you'll get the sliding table set up quicker and easier. Earlier you measured and recorded your "initial conditions" - right? From that information you've found where you're going to start the set up process. Don't try making ALL the corrections/adjustments for a single point in one pass. Make half the adjustment and then check its affects on the other 7 points (there are 8 points to keep track of remember?). At each check point make your adjustments in Half the Distance and check the affect at the other 7 points. I know, it sounds like that will take a lot longer. In the long run it won't - honest.
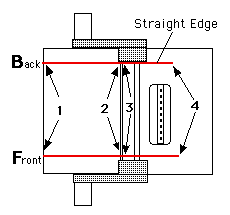
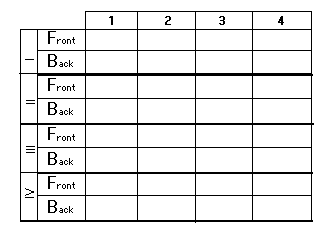
Here's where you're going to be taking AND RECORDING meaurements. A light behind the straight edge will help you see where the bottom of the straight edge is or isn't touching the two tables but use the feeler gauge to tell you what any gaps actually are numerically. You might also want a table to record what the numeric values are.


A few iterations of adjustments and you should have the sliding table top parallel to the saws table top and slightly above it. Just for reference, 1/32" = 0.0313 inches, 1/64" = 0.0156 inches and 1/128" = 0.007+ inches. Somewhere between 1/64" and 1/128" - say 0.010" above the saw table top will work fine.
NOTE: If one end of the table stays high and you can't seem to lower it you either didn't read or forgot the BOLD note on page 2 - CENTER THE RAILS ON THE SAW TABLE'S CENTER BEFORE YOU INSTALL THE JIGS. The jigs hold things up well but aren't so good for pushing things down. If the rails aren't centered on the saw table the long end will pull the short end up.
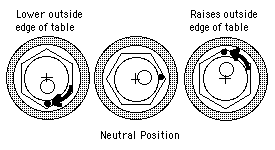
Remember the Eccentric Bearings you set to their neutral position way back when? Well now that adjustment option may be used to fine tune things. Here's how it works in case you forgot.

When you've got the table where you want it, tighten up the bolts that attach the rail support brackets to the cabinet. Snug the adjustment bolts up against the bottom of the rail support bracket and tighten their lock nuts.
To remove the jigs loosen the knob on the miter bar stock and the other bolts if they're pressing down on anything and slip the jigs off the upper rails. PUT THEM AWAY WHERE YOU CAN FIND THEM AGAIN (god forbid)
Adjusting the sliding table to track parallel to the miter slot is covered on page 17 of the Draft Set Up Instructions. Pay particular to item 6 on that page describing Robland's trick for fine tuning the tracking using the arbor tilt mechanism. To Page 17 ---->