Turning Branches and Small Logettes With The "Pith In" - The Dreaded "Pith In" Cracking!
You decided to try you hand at woodturning, got a "mini/midi" lathe, some turning gouges and chisels and went looking for some wood to turn. Somewhere early on in the Turning Journey we all seem to have a go at turning a fresh cut branch - maybe off a neighbor's tree. Wet wood is easier to turn, especially end grain - and the wood's FREE! So a branch is placed "between centers" and we make the chips and curlies fly. One of those early wet turnings comes out looking half way decent so it's a Keeper. A day or two later, a week at the most, that piece starts to split/crack/tear itself apart.
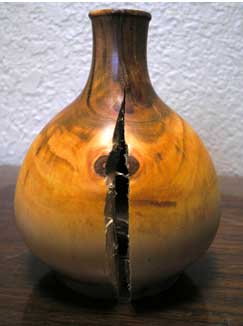
"Dried too fast." you tell yourself and the next wet turning gets put in a pile of shavings or in a paper bag or wrapped in layers of newspaper. That slows things down a bit - but the cracking/splitting/tear itself apart thing just seems to come back - eventually.
After you've turned other stuff - including wet wood - that DIDN'T HAVE THE PITH IN IT - and got the Drying Thing under control - a question arises. WHY do "pith in" turned pieces tend to crack when "non pith in" stuff, even from the same branch - DON'T? The next question is "What is it about the pith that seems to cause cracking?", followed by "What can I do to "pith in" turnings to minimize, or eliminate cracking?".
Well, I've been thinking exactly the same questions and looking into WHY. What follows is what I've come up with - so far.
1. What the hell is Hygroscopic?
2. Why is there a damp spot where I left this fresh cut branch standing on end.
3. Water is water - so what's this about Free Water and Bound Water and what the hell is MC?
4. Drying TOO fast is BAD! Why and How do I slow it down?
5. Axial, Radial and Tangential Shrinkage?
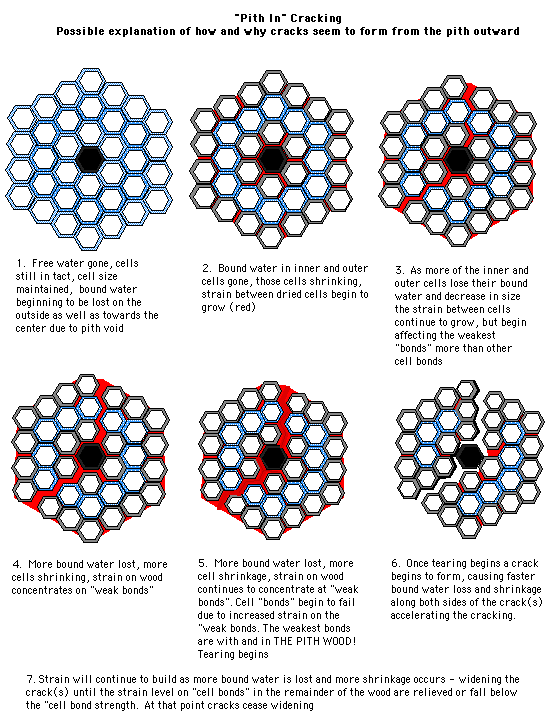
7. So what's going on with "pith in" wood as it dries and why should I care?
Links
1. Wood is Hygroscopic (No, not hyDrosocpic - that something else - similar - but different). Hygroscopic means that wood will ALWAYS try to keep its moisture content (MC) as high as its surroundings will allow, in equilibrium with its environment(Equilibrium Moisture Content), in harmony with the universe. HOW it does that is sort of intuitive when you think about it. WHAT it does is important - wood moves - constantly shrinking or expanding depending on the moisture levels in its surroundings. doesn't happen real fast, but it will continue changing dimensions. If you make solid wood furniture - or turnings, or carvings - you'd better plan to accomodate its movement, or have your piece deform, worse yet, pull itself apart.
2. Think of what wood does as part of a growing tree. In addition to making the tree taller / bigger, it supports leaves, branches, and maybe flowers, fruit or nuts- AND it carries nutrients from the root system to the rest of the tree, the nutrients being transported in a liquid - sap. So the wood has semi-hollow cylinderical cells that act sort of like pipes - or a better analogy woulb be a bundle of straws. Squeezie a bundle of straws by pressing on both ends of the bundle. Pretty strong right? Great for resisting compression AND tension - just what you need to support branches, leaves, etc.. And if you want to draw water UP - a straw is a nice thing to have. In one direction the bundle is very strong. In that same direction it's also porous If you place one end of a straw in water, and your mouth on the other end, it's easy to suck a liquid through the straw. Now try the same thing with one SIDE of the straw in the liquid and your mouth on the other side of the straw. You can collapse a lung faster than you'll be able to suck water through the sides of a straw. Water travels through wood "up the straws" easily. water doesn't travel through wood "acrossed or between the straws".
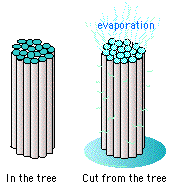
(If you want to demonstrate the Wood Is Like A Bundle Of Straws idea, get a piece of Red Oak - say 1"x1"x6". Dip one end in liquid soap, or "special" soap bubble blowing solution, then blow from the opposite end. Bubbles will start forming on the soapy end almost immediately - red oak is that porous - ALONG THE GRAIN - through the end grain.)
Given the straw analogy, it's understandable that wood loses or gains water much faster through end grain than side grain. So when you stand a fresh cut branch or mini-log on end some of the water in it will start evaporating off the top end grain and gravity will draw water down towards the bottom end grain. With some woods the water almost pours out of the wood.
3. Lets talk about the water in green/wet wood. About 40% to 45% of the green wood's weight is water. The Moisture Content of wood is the percent of the total green woods weight that's water.
Wood has two types of water in it, Free Water and Bound Water. The Free Water is inside the wood's cell walls and makes up around 60% of all the water in the green wood. The remaining 40% of the water is Bound Water and is IN the cells walls, and in the lignin that "glues" them to each other. When ALL the free water has left the wood, the wood is at its Fiber Saturation Point - with only Bound Water remaining. So, relative to the Total Weight of "green" wood, 60% is actually "wood" and the rest is water, 24% is Free Water and 16% is Bound Water. BUT - a finished piece sitting in a home WANTS to be is 6%-10% MC. Even when ALL the Free Water is gone and the wood's MC is down to 16% - and feels dry - it ain't dry enough
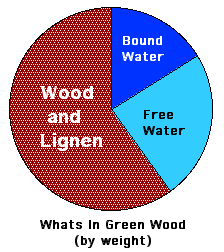
The Free Water is easiest to get rid of by evapoartion at the wood's surface and osmosis from inside the wood to the wood's surface, some to and through side grain, but mainly to the end grain. (The actual mechanisms of water movement within wood is a bit more complicated. for a more thorough explanation see the Widipeida link at the end of this page.) Controling the rate that Free Water is lost is the first order of business if you want to avoid cracking. Well get to why next.
4. Wood immediately begins losing water/moisture from the moment you remove it from the living tree, and as it does, it shrinks. It's literally going to try and tear itself apart if you don't control its moisture loss rate. The first thing you want to do is "seal" the end grain since moisture is lost most rapidly through the end grain. Every household has some old house paint on a shelf somewhere and painting it on the end grain might seal it. If it's an alkyd/oil based paint it would do the job, sort of. But if it's latex you'll think you sealed the end grain by painting it - but actually won't. Latex paint is formulated to allow moisture to pass through it., albeit slowly, though not slowly enough to significantly reduce "shrinkage" cracks from forming.
A better way to seal the end grain is with hot wax. It goes on a lot thicker than any paint, even a thick paint, sticks pretty good and seals really well. There is a potential fire danger if you melt the wax with an open flame and hot wax sticks to skin just as well as it does to wood - and burns like a Son Of A Bit**. Safer and just as effective alternatives to hot wax are available - one such commercial product being Anchorseal - a white thick/viscous waxy "paint" that dries almost clear . Stuff's expensive in quarts but in the $30 a gallon range when bought in a gallon or more volume. A half gallon will seal a LOT of end grain, especially if it's mainly smaller branches
With the end grain sealed you've got control of most of the shrinking and cracking problems. If you were going to let the wood dry before you turn it the only other thing you need to do is to store it out of direct sunlight and protect it from rain and snow. Oh - and you must also wait - a L O N G time - about a year per inch of thickness, give or take a month or six. NOW you have some time before you HAVE to turn your "green" branch - that still has the pith in it.
When you do turn it you'll be exposing more unsealed end grain - and the wood will again start loosing Free Water. THAT means you need to turn green wood fairly quickly - no rough it to about the shape you want and wait a day or a week to turn it some more. If you ain't turning it and it ain't done - it should be in a closed paper bag or wrapped in newspaper or under a pile of "green" shavings. If there's a lot of end grain on the bottom - like say a small plate or bowl - reseal the bottom before bagging, wrapping or covering in shavings The answer tow WHY is next.
5. Axial, Radial and Tangential Shrinkage - HUH?
As wood dries it shrinks. DUH!
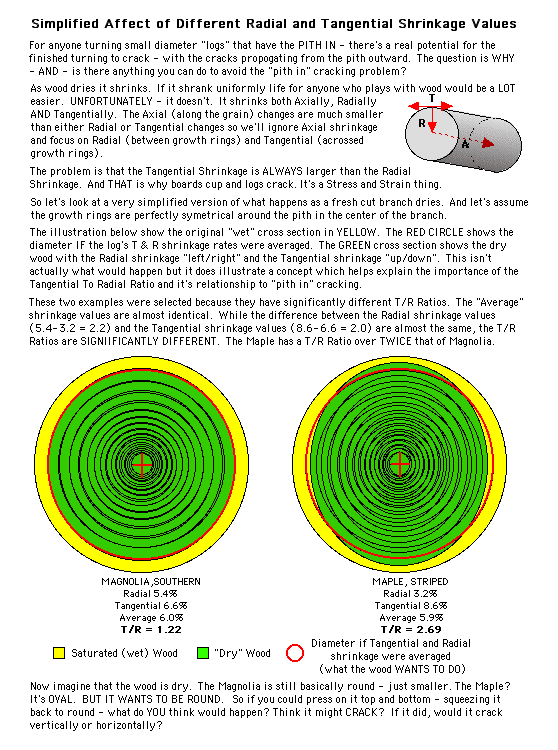
Ah - but it doesn't shrink uniformly. It shrinks "with the grain" (Axial), "acrossed the grain" (Tangential) and "between the growth rings" (Radial), least "with the grain" (Axial) and most "acrossed the grain" (Tangential). Axial shrinkage is so small that it's not worth worrying about. That leaves Tangential and Radial Shrinkage.
Here are the shrinkage values for three woods, along with their T/R Ratios.
T/R Ratios? I was having trouble keeping track of Tangential and Radial, what the hell is T/R Ratio?
Relax, it's just the Tangential value divided by the Radial value. Why the T/R Ratio is important will be revealed shortly. For now, just look at the numbers and try to figure out which of these three woods is more likely to crack as it dries.
Magnolia, Southern
- Radial 5.4%
- Tangential 6.6%
- T/R Ratio 1.22
Maple, Striped
- Radial 3.2%
- Tangential 8.6%
- T/R Ratio 2.69
Persimmon, Common
- radial 7.9%
- Tangential 11.2%
- T/R Ratio 1.42
Which do you think is the least likely to crack as it dries?
Guess #1: The Striped Maple has the smallest Radial shrinkage value so I guess MAPLE would be least likely to crack.
WRONG!
Guess #2: Well it can't be the Persimmon, it's Tangential value is the biggest. So that leaves Magnolia or Maple. Maple has a lower Radial shrinkage value than Magnolia but its Tangential value is bigger than Magnolia's.
I already got yelled at for guessing MAPLE - so - I'm giong with MAGNOLIA!?
RIGHT - but for the wrong reason.
Now look specifically at the T/R Ratio. Care to guess again?
Guess #3: MAGNOLIA! Definitely Magnolia! It's gotta be Magnolia then Persimmon and then Maple!
EXCELLENT DUDE!
The T/R Ratio IS a great predictor of whether a wood will crack or not as it dries.
You still have to control how, and how fast, it dries - and there's still that "Pith In" problem . . .
