When you think of the perfect finial for a beautiful lidded box, Cindy Drozda's "Onion Finial" probably comes to mind - tall, delicate, graceful, elegant and perfectly proportioned. Other than the thin neck, it doesn't look like it'd be difficult to turn. But you'll quickly discover that it's the proportions that are the really tricky part. A little too long here or a little too wide there and the one you turned just doesn't look quite right. Something's off and it's hard to tell just why.
Cindy Drozda is a rare combination of a very skilled turner with an artist's eye for perfect proportions. It's her proportions that make her Onion Finials immediately recognizable and it was her proportions that I was after. Figure them out and I (and anyone else) could turn a Drozda-esque Onion Fiinial for some future piece. Developing the turning skills and techniques to turn it - well that's just a matter of practice. Getting the right proportions? THAT takes a bit of understanding not just practice. And THAT is what the following is all about.
In 2011, Cindy Drozda was the guest of a Wood Central''s "Wednesday Turning Chat" where folks can ask questions of, and get answers from, the chat's guest.. The chat included a link to a well illustrated, thirty eight page PDF "handout" - Cindy Drozda's Fabulous Finials.
Starting with a line drawing of one of her "Onion Finial" in this handout, and with my Engineer's Hat on, I went searching for The Secrets Of The Drozda Onion Finial. I suspected that The Golden Ratio (1 ; 1.618) plays a role in the proportions.
If you don't want to get into the Hows and Whys of the proportions of The Drozda Onion Finial Proportions and want to go directly to The Diagram & The Spreadsheet - CLICK HERE
If you want to understand WHY the proportions of a Drozda Onion Finial are so pleasing to the eye and and HOW they're arrived at - read on.
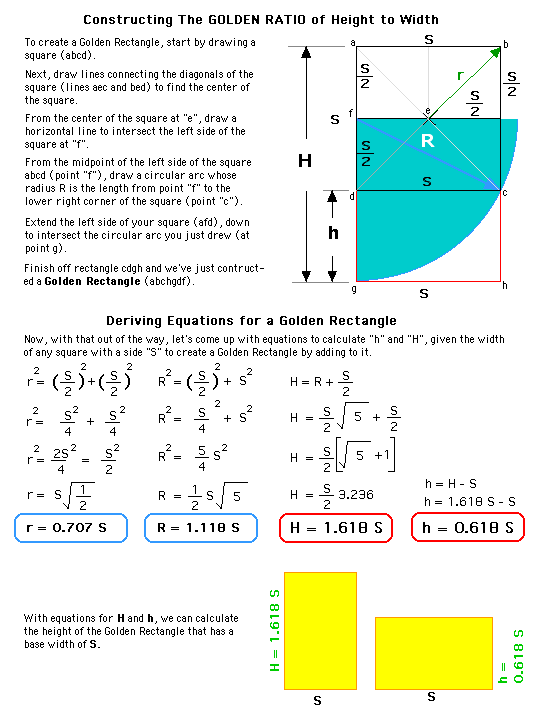
So let's start with The Golden Ratio, 1 to 1.618. You'll find The Golden Ratio in architecture, sculpture, paintings - and in nature. Google "Golen Ratio" if you want to see just how ubiquitous it is. Here's two approaches to come up with a Golden Rectangle (the width to height or height to width ratio being 1 : 1.1618)
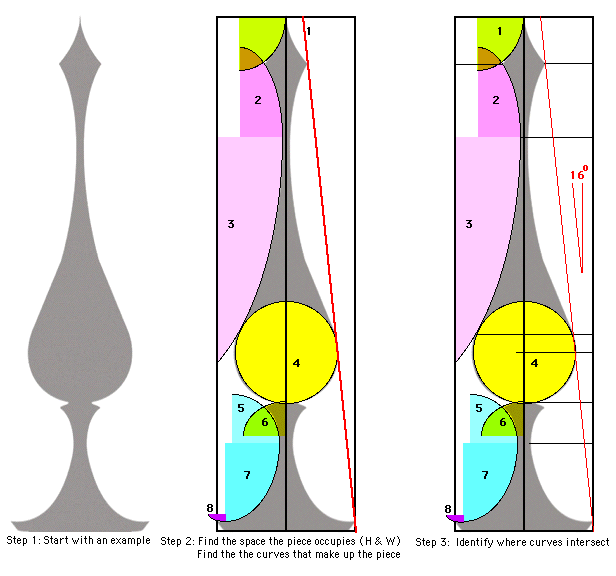
Now let's take a Drozda Onion Finial and how I analyze it.
Step One was getting an image of the finial example in her "handout" into digital form and then bringing that image into a simple CAD program (Aldus SuperPaint 3.5 (last updated in 1993) where things could be measured, the shapes of the elements of the finial found and the "control points" identified for subsequent measurements.
Step Two was to start with the "envelope" of the finial (it's Height and Width), then find the curves that define the profile of the finial and identify where one curve transitions to another - at their TANGENT POINTS (Control Points). These tangent points (Conrol Points), where curves are blended togehter seemlessly, are one of the key "secrets" of Drozda's Onion Finials, the other key being perfect proportions - which is what we're looking for.
Step Three was to identify the Control Points within the Envelope of the finial in order to begin measuring distances to and between each one.
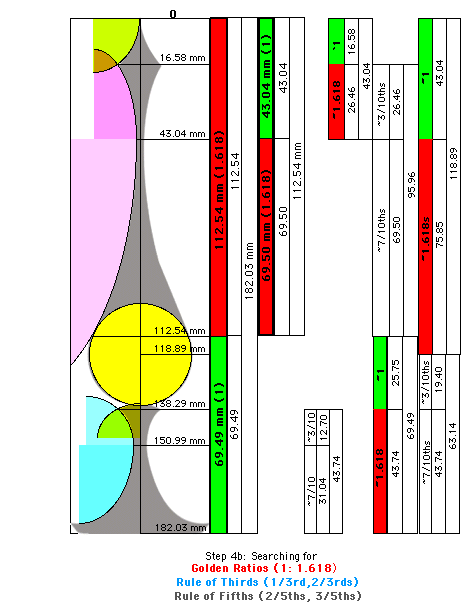
With measured distances for each Control Point, we now have numbers to work with and can start calculating ratios and start looking for the three suspected "secrets" - The Golden Ratio (1 : 1.618), The Rule of Thirds (1/3rd : 2/3rds) and The Rule of Fifths (2/5ths : 3/5ths). These ratios tend to produce pleasing proportions and have been being used by artists for centuries if not milleniums.
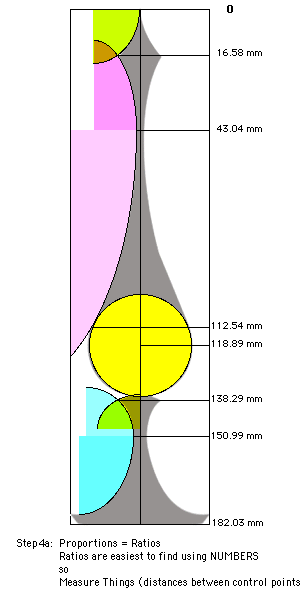
Note that I chose to measure in millimeters because they're easier to work with than inches and fractions of inches or even decimal inches - AND - because millimeters are unfamiliar to Americans. What we're after is RELATIONSHIPS, not specific numbers, proportions not specific distances. Distances can be calculated once the proportions are worked out and mathematical equations developed for them. It's these equations that will permit us to decide on the height of the finial we want, then calculate where the control points must be for that specified height. (We'll get to proportions of widths later.)
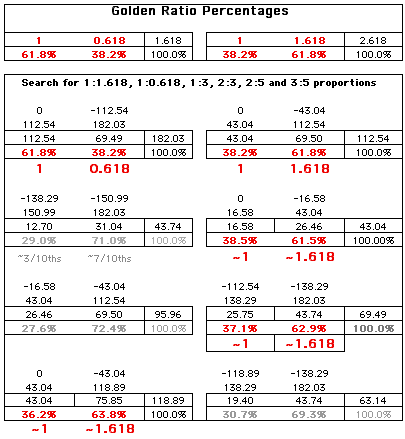
Using a spreadsheet and working with pairs of distances between control points, we can start calculating ratios. And we'll use percentages rather than decimal values because it's easier to recognize key ratios as percentages.
SO - in addition to looking for Golden Ratios'percentages we'll be looking for quarters, thirds and fifths.
25% = 1/4 so 25% : 75% = 1 : 4
33.3% = 1/3rd so 33.3% : 66.6% = 1: 3 ( The Rule of Thirds)
40% = 2/5ths so 40% : 60% = 2 : 5 (The Rule of Fifths)Note: in the following diagram, the "squiggly line" (~) in front of a number means "approximately" or "Close Enough", as opposed to "absolutely" or "exactly".
Here's the a screen shot of the spreadsheet I used to look for Special Ratios.
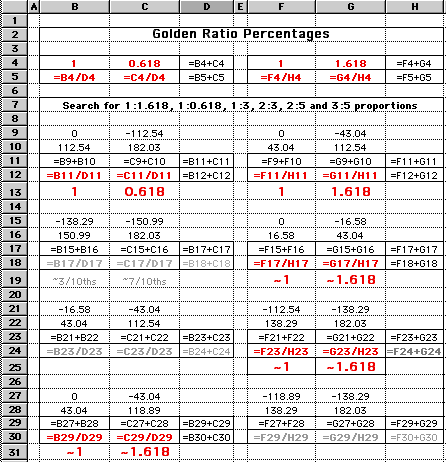
Here's the same spreadsheet - with the formulas used for calculations in case you want to make your own spreadsheet.
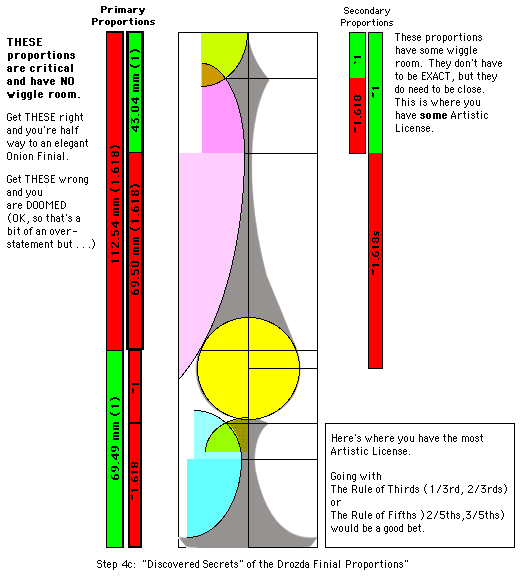
Removing extraneous stuff, here's what was discovered. Surprise, surprise, surprise -The Golden Ratio!
Now that we have some insights into the vertical proportions' secrets, it's time to look at the WIDTH proportions.
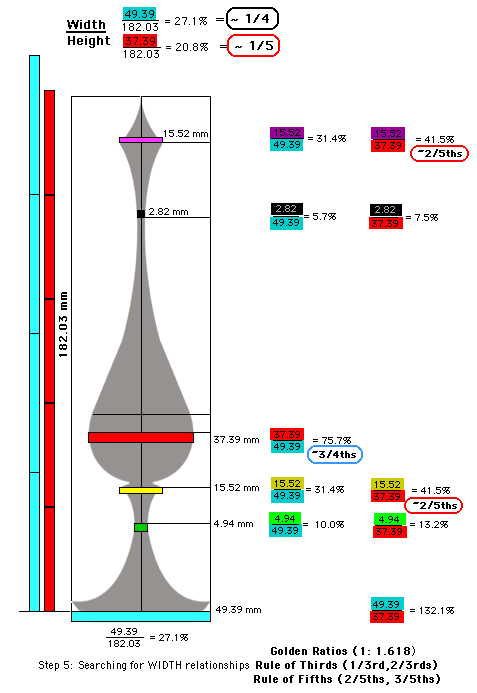
Looks like The Golden Ratio ain't here. And it looks like it's not the diameter of the base of the finial that defines the important proportions - it's the diameter of the base of the "onion" that's the key - pretty close to 1/5th the finial height. And The Rule of Fifths appears to apply for two of the six key diameters of the finial. Seems like we've got a little Artistic License wiggle room with some of the the finials diameters.
If you've gotten this far, you're probably saying to yourself - "This is all very interesting. But how do I use it - to layout a finial I want to turn?"
Well, I'm glad you asked.
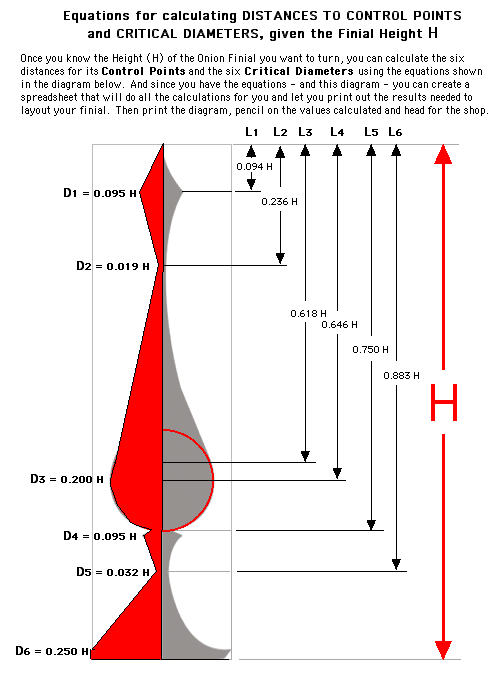
HERE is what you can use of what we've found - to layout the Control Points and Critical Diameters for your finial. Note that the distance to Control Points are all based on the Finial Height and are all measured from the tip of the finial,. That's because the tip of the finial will be the Tail Stock End of your blank, the Drive/Head Stock End will be in your chuck - and it's the Drive/Head Stock End that will have exra wood for turning the tenon on the bottom of your finial once it's done.
