The Development of an Affordable Video System for Turning Demonstrations
(when this video system is all worked out and shown to work well, I'll put a link here to a page with all the parts, with sources, part numbers and prices)
You may have seen or read about this Audio / Video System the AAW used at the 2012 San Jose Symposium - a very slick set up for demonstrations - and something every turning club could use.
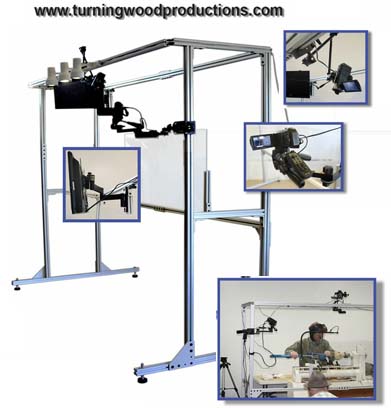
However, at $750 (plus shipping) just for the frame, our little turning club of about 70 members can't afford the FRAME, let alone the rest of this system - HiDef cameras, special camera &, monitor mounts, HDMI switcher, etc.. And there was an issue with 5 to 7 seconds of BLUE SCREEN every time the video feed was switched from one camera to another.
BUT WHAT IF . . . a similar system could be put together - for about what just the frame cost ?
Before we get to putting together an affordable video system, we need to get some understanding of video, ideo cameras and video signal processing
Oh no! Am I gonna have to learn a bunch of TECHNICAL stuff!?.
Relax, you can skip this "technical stuff" and come back to it later if you need to. But if you want to learn more about video cameras, here's a link to a pretty good place to visit.
ABOUT ANALOG vs DIGITAL VIDEO
Murphy's Law says "If anything can go wrong - it will." The more complicated a system the more things that CAN go wrong - WILL go wrong.
Since video is the key part of this system we're developing, we'll start with the video cameras, High Definition video is more complicated than Standard Definition video when it comes to getting what the camera is seeing to what the audience is seeing. The AAW video cameras and switcher were HDMI and the video displays were, I'm told, VGA. That compatability issue is apparently what caused the annoying 5 to 7 seconds of Blue Screen when camera feeds were switched, But even if everything had been HDMI you'd still get the Blue Screen Delay every time you switched camera feeds. It has something to do with two way communication between HDMI devices built into the HDMI standards. There are hardware devices that can eliminate MOST of that delay, but they're EXPENSIVE. We're after CHEAP but adequate.
There's also the difference in price to consider. Older Standard Definition / ANALOG camcorders are considerably less expensive than the newer High Definition DIGITAL camcorders. Cables for analog video signals are also less expensive than digital HDMI cables, That goes for analog switchers vs digital switchers as well.
SO - we're going with a Standard Defintion analog video SYSTEM, We're not after The Best. Close Enough will do just fine,
ABOUT CAMCORDERS & REMOTES
Pre HD camcorders (IE STANDARD DEFINITION OR COMPOSITE VIDEO) are MUCH less expensive than the newer HD camcorders and can be found on eBay, Craigs List or in your local paper's For Sale section. You, or members of your turning club, probably have old camcorders stored away in a closet or drawer. Before you go looking to buy used camcorders, ask club members that probably have old camcorders to consider donating them to your club.
You're after camcorders with an RCA Composite Video Out Port AND a wireless Infra Red remote control. Almost all older camcorders had IR remotes. Many of the new HD cameras DO NOT HAVE IR REMOTES.
NOTE: Some manufacturers, SONY for example, seem to use a single set of IR remote codes for ALL their cameras (ie codes 26 & 27 are for zoom IN and zoom OUT). THAT means when one camera is zoomed, ALL the cameras are zoomed. NOT A GOOD IDEA! For this reason, it's advisable to get video cameras from different manufacturers or from manufacturers that have different IR remote codes for different models of their cameras. JVC apparently went with this idea.
Another thing to be aware of when selecting a camcorder is whether it has a Stand By Mode or not. Battery life has always been important for camcorders. When camcorders recorded on magnetic tape, CDs and small hard drives, manufacturers came up with a way to not waste power spinning a drive motor for tape, CD and hard drive - when not actually recording. If the camera has not been called on to record, or has been paused for some period of time, the drive motor is powered down into Stand By Mode. When small displays replaced the old View Finder they also consumed power. So the same When Not Being Used - Power It Down - Stand By Mode idea was used,
Here's the "challenge" of this Stand By Mode - it shuts down the camcorder's Video Out function. No output signal from the camcorder, no signal to the Director's Station monitor, no idea of what that camera is looking "seeing" while in Stand By Mode.
Since we aren't relying on the camcorder's battery - we're providing power from a wall outlet -
we have to have camcorders that permitTURNING OFF STAND BY MODEViolet BlueViolet
The Infra Red RECIEVER'S FIELD OF VIEW on camcorders can vary quite a bit from manufacturer to manufacturer and even between different models of camcorder from the same manfufacturer. The IR Remote Control sending commands to the camcorder will only work if it's within the IR Receiver's Field of View. Because multiple camcorders wil be used, each in a different orientation (looking in from one side, looking down from above, . . .) controlled from a single location (the Directors Station) you want camcorders with very wide fields of view.
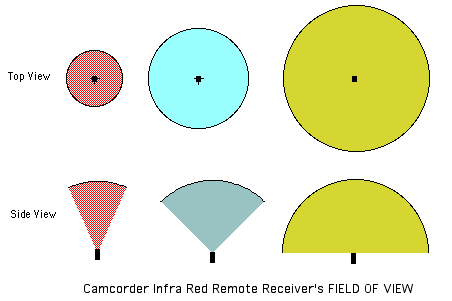
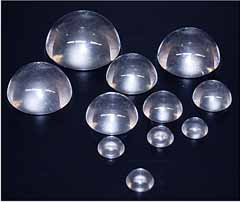
The Field of View of an IR Remote Receiver can be widened several ways - the easiest being putting frosted "ScotchTape" over it, diffusing the light coming from the IR Transmitter. Another easy way to widen the IR Remote Receiver's Field of View is to tape a clear plastic hemisphere over it. Tap Plastic carries a range of sizes of these things (see image below). LIghtly sanding the surface to frost it will increase its ability to diffuse light over a larger area, increasing the Field of View of the IR Receiver.4141
ABOUT VIDEO CABLES & CONNECTORS
Here's where things can get a bit messy. Video cabes can be simple 2 wire, twisted pair, shielded, coaxial or multi wire. Add to that the types of connectors on the ends of video cables seem like a Tower of Babel thing - Analog / Digital - Composite, S-Video, VGA, SVGA, HDMI - RCA, BNC, DVI?
Radio Frequency (RF) (analog)
Composite Video (RCA) (analog)
Separated Video (S-Video) (analog)
Component Video (analog)
Red, Green and Blue (RGB) (analog)
Video Graphics Adapter (VGA) (analog)
Digital Video Interface (DVI) (analog or digital)
High-Definition Multimedia Interface (HDMI) (digital)
DisplayPort (digital);
If you want to learn about connectors for analog and digital video cables CLICK HERE.
Going with used Standard Definition video cameras simplifies things. Inexpensive Composite Video cables with RCA CONNECTORS come in 20'. 8', 6' & 3' lengths are readily available at places like Radio Shack - and are relatively cheap compared to equivalent length HDMI cables.
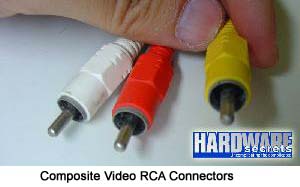
Here's what we went with - Composite Video cables with RCA Connectors - male on both ends. Since we're only using cables to get the VIDEO signal from the camera, we only need one wire with a male RCA Connector on each end. In the image below, the Red and White Connectors normally are used to carry Audio signals. The Yellow Connector is normally the one that carries the Video signals. The cables and connectors don't care what kind of analog signal they're carrying, so the colors of the connectors on the ends of the cable don't matter - they just have to be RCA connectors. Colors on the ends of cables DO matter when you need to know What Connects To What - but more about THAT later.
Wth all that out of the way, let's get to putting together a video systems for demonstrations.
Club Video System version 1
Our club is fortunate enough to have a couple of members who had video production companies and still had much of the pro equiptment - BIG video cameras, heavy duty tripods on dollys, a boom for an overhead camera, wireless headsets for each of the three camera operators, two large video monitors and two smaller ones, heavy duty telescoping stands with hardware for mounting a horizontal support rods for lights, lights, . . .
This is the basics of that set up . . .
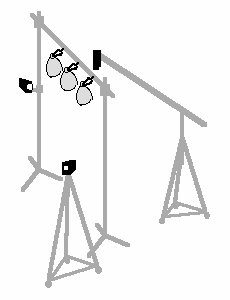
And here are some shots of an actual demonstration using that set up. Note that the lighting over the demonstator is washing out some of the video being projected onto the projection screen. We had another movie screen on a stand on hand and tried to use it to block the light from the demonstator's area, but, because the demonstrator's lights are so high, that screen wasn't tall enough to be effective.
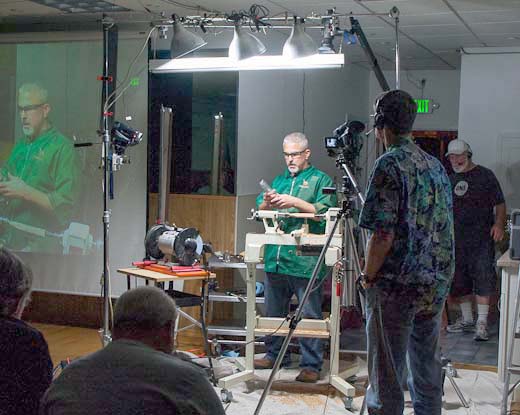
The dollied overhead camera on a long arm boom is "industrial strength" and needs quite a bit of space behind the demonstrator as well as overhead - and an operator who knows what he/she is doing. An IR wireless remote allows the operator to zoom it in and out.
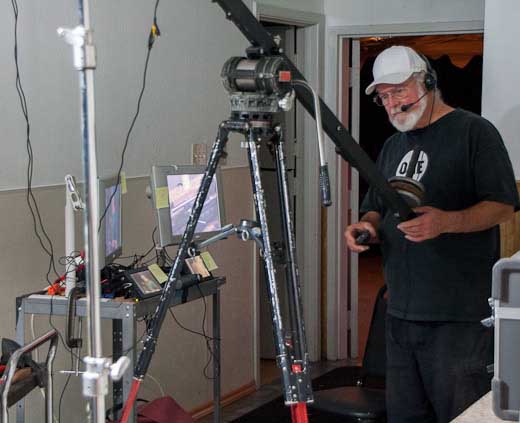
Great video system and a terrific resource for our club. BUT - it requires a camera operator for each of the three cameras, a way for them to communicate with each other wirelessly, and a LOT of STUFF - to load, carry in, unpack, set up, operate, tear down, pack up, carry out - and store. Misplace or damage any of the many parts and you've got a real problem. Most clubs also aren't fortunate enough to have a member with all the video equiptment and knowledge needed, let alone THREE good camera operators. And most clubs probably couldn't afford a set up like this anyway.
BUT . . . WHAT IF . . . there was a more affordable DIY set up - that could usually be operatied by ONE person remotely - was more transportable - quick & easy to set up and take down - easily stored - everything kept together - and you only need a hack saw to make it? With a bit of scrounging, a little searching at flea markets, a bit of checking on Craigs List - a system could be put together - for about what just the AAW's FRAME costs?
Club Video System version 2.0
Pro video cameras are great, even if they're older analog (as opposed to digital) cameras. But they'e kind of big, and still kind of expensive. They also need heavier duty tripods and camera mounts. But there are plenty of smaller consumer and "prosumer" analog video cameras out there and you can pick up a fairly good one for $50 to $75 - off Craigs List, eBay or FOR SALE ads in a local paper.
NOTE: When buying used camcorders, make sure you get the power supply AND the video cable to get the video signal from it to other things - like your video signal SWITCHER. Camcorder video output cables often need their own special plug for the camera side - and that plug may be unique to a specific manufacturer and maybe even to each of their camcorders. No power supply, no output cable and you're screwed.
Here is part of Video System 2.0 - the CAMERAS & LIGHTS FRAME - a knock down structure to support three fixed cameras on parts of tripods, lights and a blackout curtain between the demonstrator and the video projection screen and the demonstrator's area.
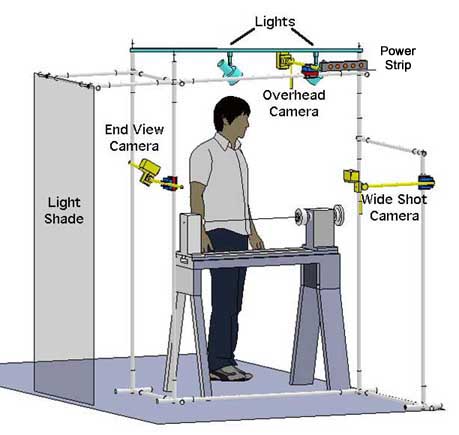
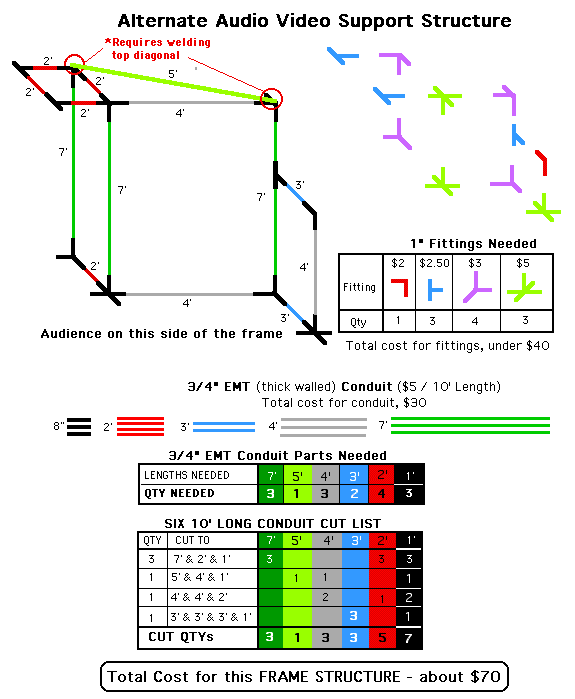
Here's the FRAME and its components - with a parts list. I picked up all the fittings at a local flea market. They're used for making portable booths - for flea markets, craft faires, etc. and come in sizes for 3/4" as well as 1" conduit. Here's an On Line source I found doing a Google search for "canopy fittings". The 3/4" EMT conduit can be found at almost any hardware store (ACE) or BORG (Lowes, Home Depot, etc.) - for about $5 per 10 foot length. Conduit can be cut to length using just a hack saw,
The whole structure shouldn't cost more than about $70, less than a tenth of the AAW FRAME, isa LOT lighter and doesn't require any tools to assemble or disassemble. The top and bottom "L" parts are permanently connected, can be temporarily joined together for transporting and storing and take up only about 2' x 4' x 16" of space. sb`s
Here are the details of the FRAME Structure. Should be enough info to get and put together a Frame Structure like the one shown above.
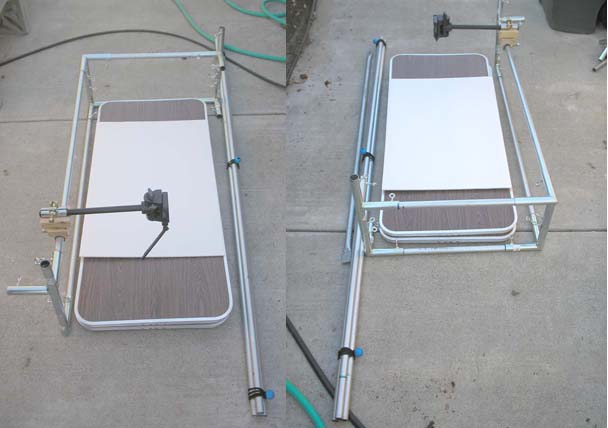
Here's the basics of the FRAME, knocked down for moving and storing. Those are two 20" wide by 48" long folding tables sitting inside the stacked upper and lower FRAME parts. The FRAME's total weight is only about 20 pounds and requires no tools to assemble - through a short screw driver through the eyelets that screw into the fittings will let you tighten things better than if you use just "finger tight". That's a camera tripod mounted in a DIY bracket that clips on the frame anywhere you want to put it.
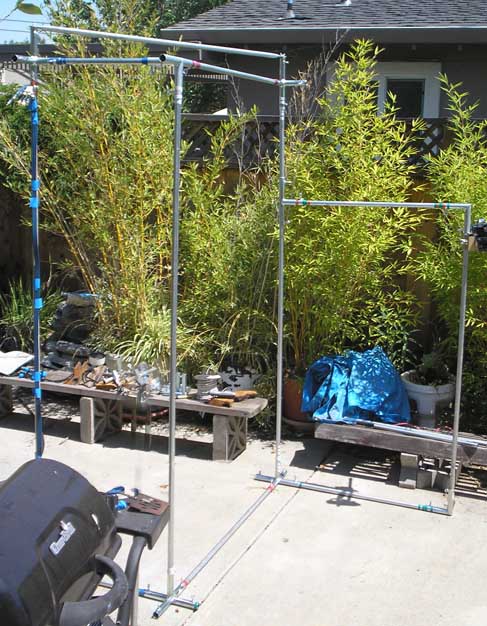
Here's the FRAME set up - with the Front Camera Support not shown in the photos above. About 92"tall, leaving plenty of room above a demonstrator. It can be assembled flat on the ground and raised under a normal ceiling height of 8' - by one person. Make it any taller and you couldn't stand it up under an 8' celing.
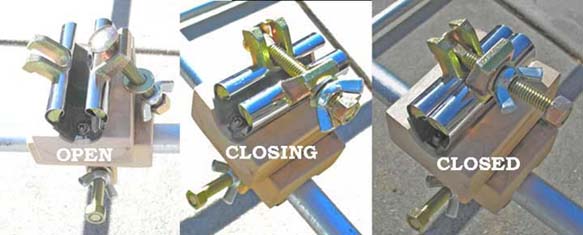
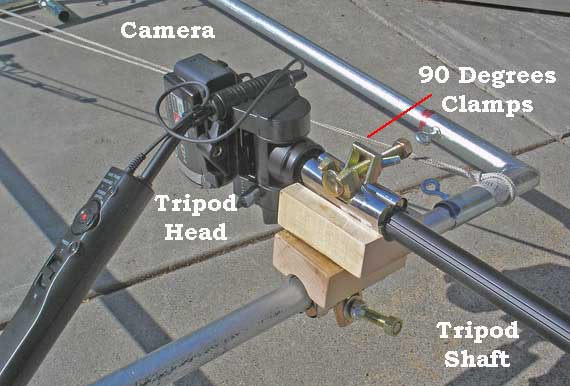
With the FRAME structure out of the way let's look at the camera mount set up. This is a DIY mount that uses twoplumbing fittings for stopping leaks in pipes. Picked these up at ACE Hardware - about $20 per pair. Screwed onto a piece of wood at 90 degrees to each other, it can be clipped onto the frame's conduit anywhere and hold the shaft of a camera tripod.
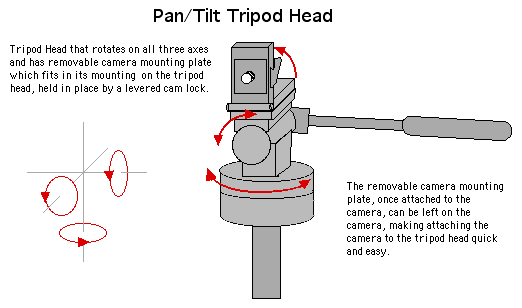
Ideally, video cameras that will be moved around, panned and tilted, would be mounted on Fluid Tripod Heads that have really smooth movement - but they're heavy and can be expensive. For fixed location video cameras, that once set correctly, need only to be zoomed in and out, second hand tripods with heads as shown below work well and can be found for $20 or less with a bit of time spent going through newspaper For Sale sections, Craigs List and eBay.
Now to THE DIRECTOR'S STATION
The Director job is
- to watch what each camera is seeing
- to select The Best Shot
- to switch that camera's signal to the Audience Display
AND
- when called for, zoom one or more cameras in or out to get each camera's Best Shot using wireless infra red (IR) remotes.
NOTE: Some manufacturers, SONY for example, seem to use a single set of IR remote codes for ALL their cameras (ie codes 26 & 27 are for zoom IN and zoom OUT). THAT means when one camera is zoomed, ALL the cameras are zoomed. NOT A GOOD IDEA! For this reason, it's advisable to get video cameras from different manufacturers or from manufacturers that have different IR remote codes for different models of their cameras. JVC apparently went with this idea. Find the manual on line for the camera you're considering and make sure the IR Remote Codes don't conflict with the other cameras in your system.
SO - we need a video display for each of the three video cameras, a video display for what the Audience Display is getting AND a video signal Switcher - all in a minimum amount of space since the Video System is to be portable. We also need a table to put all this stuff on, with enough room to also support a laptop computer if the video is to be recorded for later editing, along with a place to store cameras, tripods, clamps,spare parts, etc..
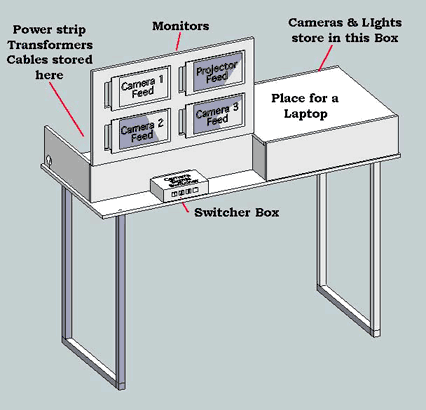
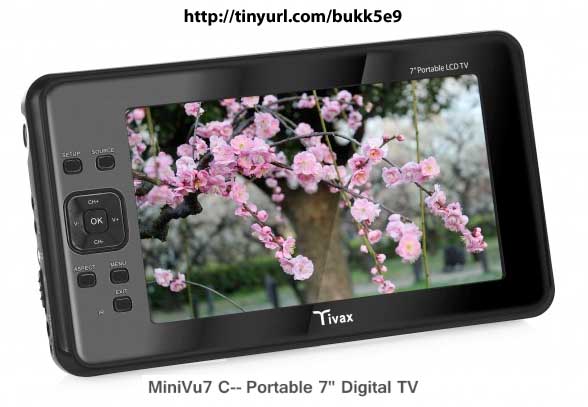
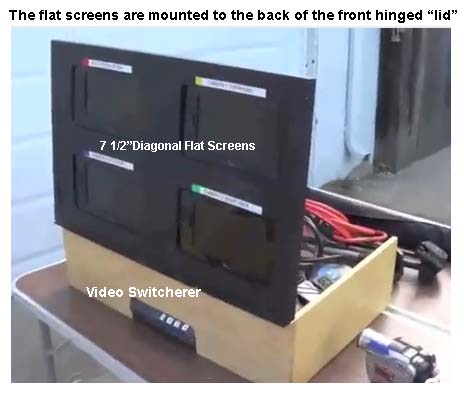
My collaborator for putting together this video system found these great little 7 1/2" diagonal flat screen displays locally - for $50 cash each (on line, they're $140). These things have VIDOE IN ports for RCA Jack analog COMPOSITE, CoAx and HDMI . They''re small enough for a compact portable Director's Station yet large enough for the director /switcher to see what each camera is seeing - as well as what the audience is seeing.
Here's the front view of the actual Director's Box - four flat screens, each labeled to identify which goes with whick camera and a video switcher.
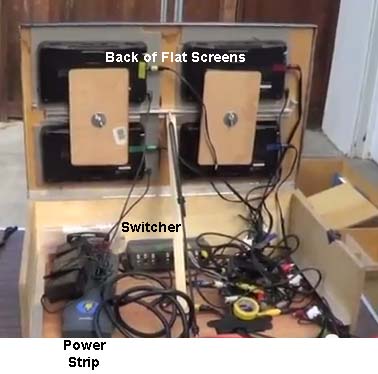
Here's what's inside the Director's Box - again, a bit of tidying up all the wires is definitely needed ; ) More details about the video cabling later . . .
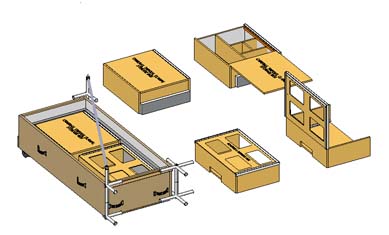
The third part of this Video System is the CART/STORAGE BOX on wheels that everything goes in or around. Not shown are the two 20" x 48" folding tables and a folding stool that stack on top of the Director's Box and Parts Storage Box.
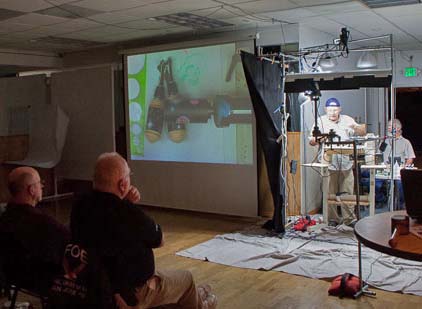
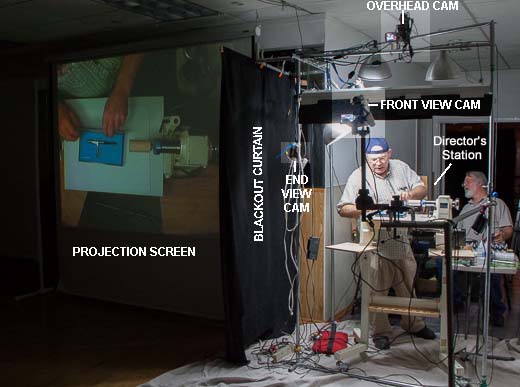
Here's this FRAME & DIRECTOR'S STATION in use. Note that the Black Out Curtain on the left side of the FRAME keeps most of the light from the Demonstator's Area from washing out the projected video next to it.
A little closer look at this Video System - with major components labeled. (We need to neaten up the wiring just a wee bit )
To see a short YouTube video of this system - CLICK HERE (close that window when you're done watching the video)
Club Video System version 2.1
Posting a description of this FRAME idea, with accompanying illustrations, to a few turning forums, I solicitied suggestions from videographers and turning demonstrators as well as from demo audiences. A PDF copy of those suggestions can be seen by CLICKING HERE.
From those suggestions, four changes / enhancements to our FRAME needed to be made.
First, replace the fixed location Front View Camera with a camera on a dollied tripod that can also be used for Off Lathe stuff - like pyrography, carving, coloring, etc. A moveable. dollied, video camera was identified as essential by both videographers and demonstrators.
Second, for demonstrations that involve end grain hollowing, the FRAME needs to be open on the tailstock end of the lathe.
Third, add another video display to let the demonstrator see what the audience's screen is showing. Demonstrators emphasized their need to see what the audience is seeing - without having to turn and look at the audience screen.
Fourth, adding something to the top front of the FRAME also seemed like a good idea - to keep the overhead lights from shining out into the audience's faces.
By making the Top of the FRAME a mirror image of the Bottom of the FRAME, the FRAME can be turned "upside down" in order to have the tailstock end of the FRAME open for hollowing. This requires the elimination of the "top diagonal brace". The top diagonal brace provides more rigidity to the FRAME and provides a flexible place on which to mount overhead lights. The addition of moveable "T" components to the FRAME v2.1 hopefully will provide the light mounting function.
The removal of the top diagonal brace makes the FRAME less ridgid, but, once the cameras and lights are set up and adjusted, there's nothing to cause the frame to move since only the lenses of the cameras move andonly when zoomed in or out,
Here's the idea - the same top and bottom components without the 7' uprights to connect them - in two orientations - on the left, an Open Headstock set up - on the right, the same components flipped end for end for an Open Tailstock set up. The purple "Ts" are moveable, to be used to hang things from - like lights. This is how these parts are stored when not in use. Don't take up a lot of space, especially when on and around THE STORAGE BOX/ CART.
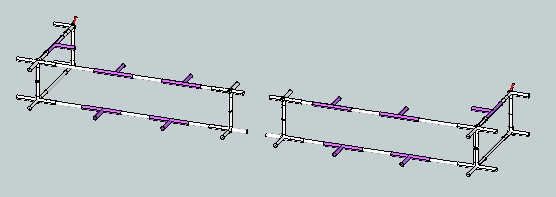
This is how this reversible frame idea looks when set up. The extra parts on the left end of each one are for hanging a Blackout Curtain (Audience Display Side Shade) from. The Blackout Curtain keeps the lighting over the demonstration area from washing out the video projected on a screen adjacent to the demonstator. For both illustrations, the screen on which the projected video will be shown is located to the left of the demonstrator. If the display screen is to the right of the demonstrator, the support elements can be attached on the top right of the frame.
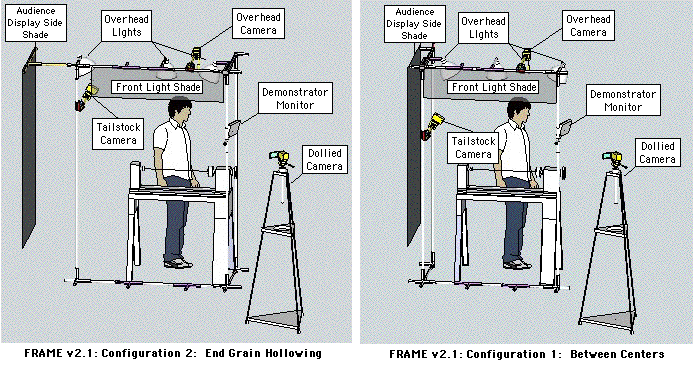
Configuration 1 works well for between centers turning and for smaller bowl and hollow form turning. With the frame set up in Configuration 2, the tailstock end of the lathe is completely open and won't interfere with end grain turning at all. For OFF LATHE work, the dollied camera normally used for long shots should cover carving, piercing, pyro work, coloring, staining, dyeing.etc,.
VIDEO CABLING DETAILS
Here is the video cables "wiring diagram" that shows what connects to what. Note that the color coding of the cabling. The connections within the Director's Station are permanently mounted. The cabling between other components and the Director's Station will be disconnected, wound up and stored between use, so they're color coded so you know which cable goes where.
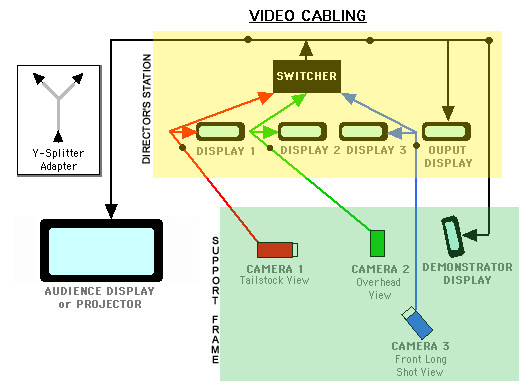
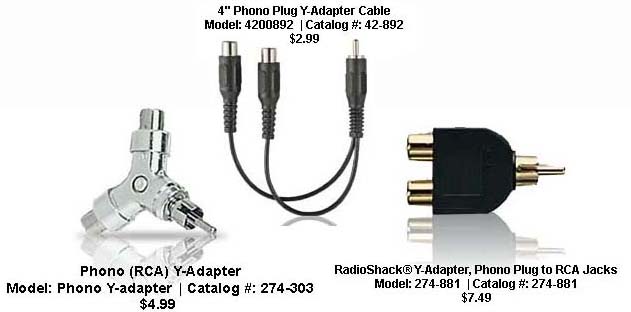
You'll need FIVE "Y" Adapters. Here are some suitable Radio Shack versions with model and catalog numbers as well as price as of 11-24-2012
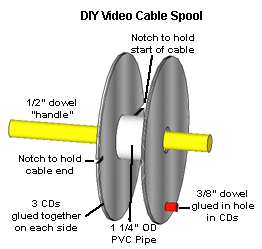
NOTE: The video cables between the cameras and displays - and the Director's Station - are going to be about 20' long. Long cables tend to knot themselves up if they can - so cable spools to wind them on - like a spinning reel - can save you a lot of unknotting time. Here's any easy one you can make. They don't take up much room and four of them will fit inside the Director's Station when not in use. Slip the camera end of a cable in the deep slot, hold the removable "handle" in one hand and crank with the other. Slip near the end of the cable in the shallow slot and you have a tangle free cable, ready to unreal when needed - no knots, no twists - no sweat.
POWER CORDS DETAILS
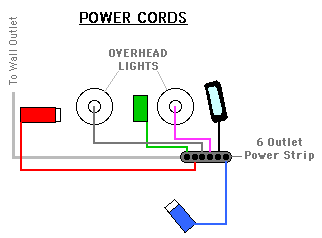
The other cabling we need to deal with is for powering the video cameras and lights. A 25' extension cord from a wall outlet or the Director's Station Power Strip - to a six outlet power strip mounted on the FRAME gets us half way there.
It's the power supplies for the video cameras that present a mounting challenge. The power cords for most video cameras have a transformer either at the AC male plug end or somewhere between the male AC plug on the power source side and the plug that goes into the camera. And the plug on that camera side is often unique to each camera manufacturer.
It's the transformers that make things complicated. Transformers that plug directly into an inexpensive power strip usually make using adjacent outlets impossible. Power strips with outlets space farther apart solve that problem - for twice the price, But hey - another $15 ain't no big deal. So go with a power strip that accomodates transformers.
TIP: COLOR CODE EVERYTHING!
If you Color Code each of your cameras, and all the wires, cables and connectors that go with it you'll save your-self a lot of time - and confusion (to say nothing of cussing and swearing). Cheap fingernail polish come in a lot of different colors - but doesn't come off easily. Tape used to color code electrical wiring give you the option to change things later if you need to. Radio Shack carries this tape in five or six different colors.
MORE TO COME