WorkSharp WS3000 Review
(Preface: I have, and use, india stones, arkansas stones, japanese water stones, DMT diamond plates, Scary Sharp, a loaded Tormek, a two wheel grinder with the Wolverine Jig, the JoolTool and japanese waterstone "slips"for the inside of some carving and turning tools. I'm a Sharpening Phreak who is always looking for a quicker, easier, way to put a nice edge on my edged tools. I'm also a Tool Phreak so I have lots of edged tools to keep sharp. I'm also the Go To Guy when it comes to designing an Idiot Proof tool. If there's a way to screw up, rest assured, I will find it - several times. And as a guy - I don't read manuals unless I absolutely have to so the more intuitive a tool is the better I like it.)
Picked up the WorkSharp WS3000 at a WoodCraft Manufacturers Day Event for a Special Deal price" of $179.95 - plus California Sales Tax which brought it close to $200. This was after trying it out of course - on the WorkSharp guys chisel. Wasn't prepared for this event or I'd have brought a Rode Hard & Put Up Wet Stanley Everlast socket chisel. I was a little concerned about the slight run out on the "arbor" shaft - but it didn't affect the results so I bought one - along with an extra set of the "perforated" sticky backed paper abrassive disks - for another $20 IIR.
Here's what comes with the WS3000 package, in addition to the unit itself.
Note that there are FOUR different grit "perforated" paper disks (120, 400, 100 and 3600) and only ONE perforated "plate" to attach them to. Since they're sticky backed, once you remove one it's done for - AND they ain't cheap - so you need THREE more perforated "plates" - at about $15 a pop. It's the Stuff You Need but Don't Come With It that is the hidden cost of this unit/system - extra perforated sand paper and extra perforated "plates". Though the four "normal" sticky backed abrassive papers have two glass disks to attach them to, and you can use anybody's psa 6" disks and you HAVE TO get them from a single source. The reality is that you'll also need one more glass disk - if you're going to do any major regrinding since starting with 120 grit takes a while to get a dinged edge out and ready to sharpen. So add the price of another glass disk - $20. To make this thing a User the price tag, is closer to $230 than the apparent price of $180.
More about what I call the Hidden Cost later.
The funny black bar with the two knobs is for free hand sharpening on the top of the spinning abrassive disks. UNFORTUNATELY - it's a larger diameter than on the Tormek so Tormek jigs DO NOT work on the WorkSharp - dammit!
(Note To Self: See about making a replacement that WILL take the Tormek jigs)
Here's the front of the unit.
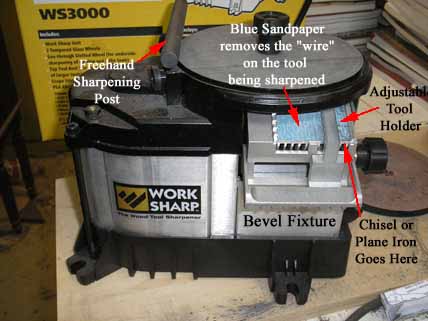
The Bevel Fixture is cast aluminum and acts as a heat sink to keep the tool from overheating - nice thing to have. The right side acts as the reference fence. Itd is tangent to the disk's rotation and the tool is held against this fence with an adjustable "hold in". The entire Bevel Fixture has an adjustment feature to allow adjusting it to parallel the sharpening disk. My unit was set up properly when I got it, but it's nice to have an adjustment option. The designer of this thing knows sharpening. He or she even included a stick on sand paper to automatically remove the "wire/bur" on the tool as it's pulled down and away from the underside of the sharpening disk. They even supply a spare with the kit. Thoughtful.
The Freehand Sharpening Post lets you make your own special sharpening jigs. As noted earlier, it's a larger diameter than that on the Tormek - so the Tormek Jigs don't fit it. Pity - would've been REAL handy. But it might work with the Veritas sharpening jig.
Here's what makes the WorkSharp almost Idiot Proof when it comes to single bevel chisels and plane irons
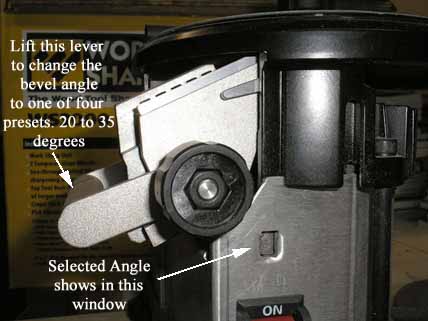
- four presets for the bevel angle - 20, 25, 30 and 35 degrees. Lift the lever and click into one of the four presets. Done! No measuring of exposed blade to get the angle for your particular sharpening jig(s) With the exception of the 35 degree preset, you can add a 5 degree micro bevel to any of the other three bevel angles with a click of the lever. Slick.
Here's the Freehand Sharpening Tool Rest for those who like to Wing It, or have, or like to make sharpening jigs.
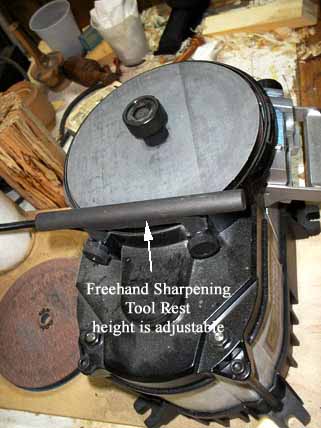
You can adjust it's height above the wheel by loosening the two knobs and raising or lowering the bar. But that means there has to be a little slop or you couldn't raise or lower the bar. That could mean that you'd get a slight taper to the width of your bevel because the bar might not be parallel to the top of the spinning glass disk with the abrassive on it. Though I haven't used this "feature" yet, it is a concern. Probably not actually going to be a problem - but it might be.
And here's what sets this sharpening system apart from all the others - EXCEPT the JoolTool - it lets you SEE what you're doing to the bevel AS YOU DO IT. With all the other systems/methods, you grind a little - and check the bevel - grind some more - and check the bevel - grind some more - and check the bevel - grind some more - and check the bevel (see The Point yet?)
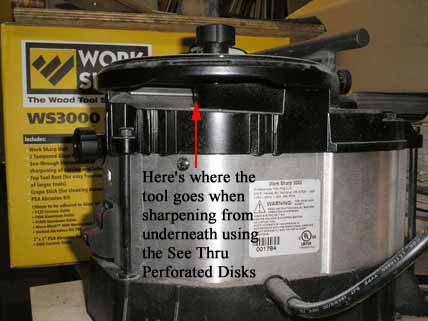
Perhaps a little explanation is in order. When the disk with the spokes /slots in it is spinning, you can "see through it". And if the edge to be sharpened is brought to the spinning abrassive from UNDERNEATH - you can look down and SEE what you're doing - as you're doing it. No more grind - check - grind - check - grind . . . You check AS you grind - continuous visual feedback - immediately. THAT is revolutionary when it comes to sharpening. Now WorkSharp didn't start the Revolution - JoolTool did. But WorkSharp recognized the value of this idea and incorporated it into this tool. And, unlike the little 3" diameter JoolTool Ninja approach, WorkSharp used the idea on a 6" diameter wheel. That means more area to sharpen on - AND more feet per minute so it removes metal faster. That "faster" thing cuts both ways though. You can get the job done faster - or have things go To Hell In A Handbasket faster.
Now this Sharpening From Underneath thing takes some getting used to. YOU are the sharpening jig - no store bought or shop made jig to control the tool and the grind. If you've freehanded before you know that it can result in facetted bevels and edges that aren't square to the sides of the chisel or plane iron. It takes some practice and some skill to freehand sharpen.
The first time you mount a slotted wheel you may ask "How the hell am I going to see what I'm doing through these thin little slots?" Then you turn the unit on and that question is answered.
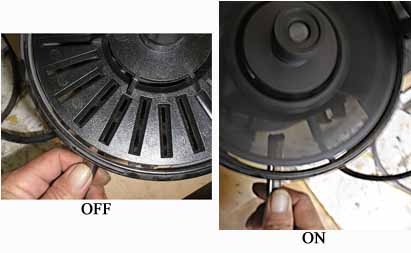
Still, idea of bringing a tool up to a spnning disk - with "slots" in it -can be a bit intimidating / scary. Catch An Edge (turners - you know exactly what that means. Skiiers - you do too.) and you tear up the expensive abrassive paper, to say nothing of scaring the hell out of yourself.
Well, it really ain't that difficult - if you you use the right technique - honest. (but just in case, get a spare set of slotted paper thingees)
The TRICK is to be able to see the effect/affect of what you're doing. If you've seen Ani demonstrate the JoolTool at a woodworking show you already know about the Sharpi Pen Trick.
1. Blacken the bevel you want to work on with the Sharpi so you can see WHERE you want to remove metal
2. Bring the edge up to the wheel, making first contact AT THE HEEL OF THE BEVEL
... you'll see where the contact is being made because the Black will be disappearing at the Point Of Contact
3. Once you see where you're making contact, lower the tool handle and the Point Of Contact will change to a Line of Contact
4. Once you've see the Line Of Contact you can either
... a) rotate the tool to move that Line Of Contact acrossed the bevel - for a curved cutting edge
.... - like a bowl or spindle gouge or a "sweep" carving gougr
... OR
...b) bring more of the bevel into contact with the rotating abrassive to create a Plane Of Contact on the ENTIRE bevel.
When all the Black is gone - you're done - with that particular grit.
If you're a woodturner, this rotating the tool around two axis (axes/axii?) will be quite familiar. For those who can't walk and chew gum it'll take some trial and error practice. But it isn't all that hard to learn to do.
OK - let's get to the Pros and Cons.
PROS
The Bevel Fixture eliminates the "adjust for the bevel angle, keep adjusting 'til you get it right and then keep the tool at that angle while sharpening" problem - IF you're ok with 20, 25, 30 or 35 degree bevel angle.(there are NO In Betweens).
The "fences" on the Bevel Fixture will hold tool in the right position, allowing it to move ONLY towards or away from the abrassive.
Because the Bevel Fixture also acts as a nice big heat sink, the tool you're sharpening doesn't get hot - unless you really lean into it and stay abrading way too long.
The stick on fine abrassive on the Bevel Fixture does remove the "bur/wire" - but also scratches the polished bottom of the chisel or plane iron you're sharpening
The Tool Rest Bar is nice to have for those who Wing It, or need a skewed bevel. I suspect that WorkSharp will come out with jigs for it at some point - like some of the Tormek jigs. Sure wish WorkSharp had gone with a diameter that was compatible with Tormek jigs.
The price of the unit - with the additional plate and slotted wheelS is in the price range of most other sharpening set ups, for some systems WAY less expensive. A pair of large enough two sided diamond plates plus jig can come to $225 or more if you go with the Veritas Mark IV (or whatever the new one is called). Four japenese waterstones and a stone flattener can easily set you back $25 or more. A Tormek, with necessary "accessores" is more in the $400 range. The JoolTool with all the needed Ninjas and little abrassive bristle brush things comes to about $300+. The Lap-Sharp is the high end of the spinning disk precision machines - but the base unit is in the $500 area - and the accessories are EXPENSIVE. AND - you can't sharpen "from below". Don't get me wrong - the WorkSharp is not in the same league as the Lap-Sharp when it comes to precision parts and performance. But it does several jobs more than adequately - and makes it relatively easy to get the job done, quickly.
Oh - did I mention "almost no mess"? With plates and stones there's either oil or water AND "slurry" to deal with and a roll of paper towels you need. With the Tormek it's that damn water tray - and water getting on things. With regular or "slow speed" grinders there's all that dust and grit that comes off the wheels - and that dust is ABRASSIVE. Like the JoolTool, there's very little mess flying around and getting on everything, nor oil or slurry on your shirt and pants - AND hands.
Foot print is relatively small, not as small as the JoolTool, but smaller than most sharpening alternatives. This can be quite a significant advantage for the Space Constrained.
With the exception of the glass disks and the slotted disks - there are no accessories to find a place for - and then remember where you hid them.
You can use ANY 6" diameter PSA (Press and Stick Adhesive) sanding disks, in whatever grit you want, rather than being stuck with buying from a "single source" (read MORE EXPENSIVE!) and a more limited range of available grits.
CONS
The "run out" on this thing may be noticable and maybe irritating to some - though it doesn't affect / effect results.
For reshaping a bevel, starting with 120 grit takes FOREVER. That means getting another glass disk for 80 & 100 or 100 & 120 and sticking 220 on the other side of the 400 grit disk.
The price of additional - but necessary - slotted disks seems pretty high at $15 a pop and $20 for the glass disk - seems a bit pricey. But they're a One Shot purchase and should never need replacing.
The price of the special slotted PSA abrassives is steep for what you're getting, but the ones that come with the unit last a lot longer than just plane abrassive paper - like Mirka's.
The "Tool Rest" bar being a little bigger than the Tormek is a real bummer - if you already have them. Not a big deal if you don't.
All the plastic on this thing makes it look kind of cheap. Doesn't affect the performance but . . .
Because the "disks", glass or spoked plastic, can cross contaminate each other if stuck in a box or in a drawer, you'll need to make a storage box or rack or something to a) allow you to find them when you need them and b) avoid the cross contamination problem. I did a screw to the wall with turned pegs for the JoolTool. May do that for the WorkSharp. But - a nice box, with partitions and things . . .
Conclusion
No sharpening system/ set up I've found does it all. But for bench chisels, plane irons, most carving tools and most turning gouges and chisels the WorkSharp does them more than adequately, and as well, if not better than some of the alternatives - with a lot less mess, set up time and actual sharpening time. If you want to sharpen planer and jointer knives, axes and the like - look elsewhere.
Would I buy it again? Definitely YES.
Questions, comments, constructive criticism? E-mail me
Want to see one method of coralling all those Glass and Slotted Disks for the Work Sharp? Then Click Here