Weekend #4 - Raised Panels
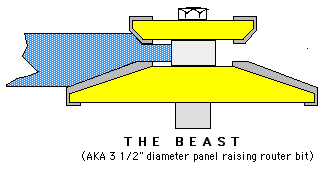
We used a plain "Shaker" Raised Panel Panel bit for the doors. As you can see, it's a BIG bit - about 3 1/2" in diamters. That may not seem "big" - 'til you put it in your router table - and realize that it's a) going to remove a LOT of wood, b) you'll be cutting both side AND end grain and c) this 3 1/2" diameter bit is going to be spinning at around 12,000 RPMS! That's 200 revolutions - a second. And each revolution will make two cuts - or 400 cuts per second. And that's at the LOWEST of my Dewalt 625, 3 hp router's speed range. This bit is also at, or very close, to the capacity of my JoinTech router table's insert, as well as the depth capacity of my JoinTech router table fence. In the Router World, this thing's a beast waiting to dovour wood - or anything else it comes in contact with (like a finger?).

(No, this hasn't been enlarged to show details. The bit actually is this BIG and the blue part is 34" thick - as shown. And it cuts both the front and back profiles at one time)
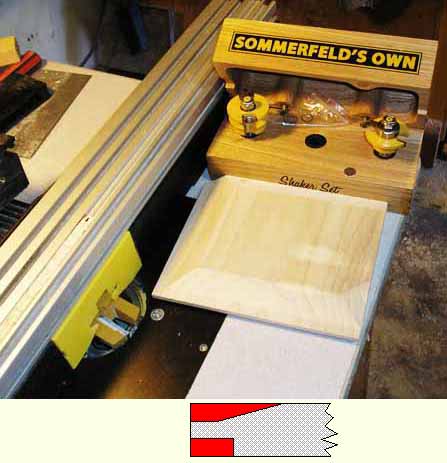
Look carefully at the photo below.
Note the gap between the black "infeed" and "outfeed" fences - close to the width of the Yellow zero clearance fence insert. Without that Yellow zero clearance fence insert, or some equivalent, that would be a HUGE gap in the fence. Realize that at the start of the cut, the bit wants to pull the part being routed INTO and BEHIND the face of the fence. If that happened, the bit would try and take off it's full profile -in one cut - in five thousandths of a second (that's 0.005 seconds)! If you think a table saw KickBack is scary - this kickback can be just as bad - or worse.
Have I got your attention now?
A PANEL RAISING BIT CAN HURT YOU!
A PANEL BIT SHOULD BE USED AT THE LOWEST SPEED SETTING YOUR ROUTER HAS
(RECOMENDED SPEED FOR A 3 1/2" DIAMTER BIT IS 12,000 RPMS)
NEVER try and cut the full profile of a Panel Bit in one pass (see the red area above - that's how much wood it'd remove - in one cut). Go with AT LEAST THREE PASSES - a bit over half the profile on the first pass, a tad under half on the second pass - and a very light cut on the third pass to keep the finished cut clean and crisp. Four, five or six passes is even safer, and will produce a cleaner finished surface.
This would be the most time consuming operation of this project - because the set up for the Raised Panel Panel bit is critical. Get it wrong and your raised panels will fit in their rail and stile frames either too high or too low. In either case, your eye will catch the fact that something doesn't look right - even if you can't identify exactly why.

