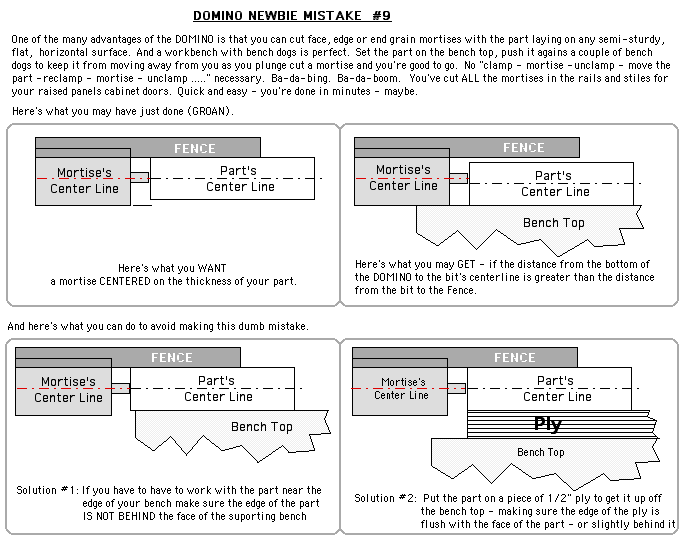
Of the FORTY mortises cut in the door rails and stiles ONE - the first one - was blown. Remember, this is a Newbie Woodworker. Here's what caused the mistake.

One mistake out of FORTY ain't bad, especially for a new woodworkerdoing the first solid wood furniture piece. The beauty of the DOMINO is that most mistakes can easily be corrected. In this case it merely required glueing a domino in the blown mortise, letting the glue dry for an hour, trimming it flush and recutting the mortise - in its correct location.
With the joinery cut for the doors we could do a dry fit and, using slip sticks to get the length and width of each of the three door panel sizes. And using the door frames to "frame" areas of the two "1x10s" we had, the areas of each board for each panel could be found and outlined in pencil. By now Paula had forgotten what each of the 1x10s had cost and was now very concerned with getting the best show face for each panel. THAT was a semi-time consuming process with a lot of lines drawn and a lot of erasing them when seen in context. Getting six coherent door panels, with the best look - out of two 1x10s took a fair amount of time - and rightfully so. These door panels go almost floor to ceiling and will be the focal point of this cabinet. There was a fair amount of "But if I cut this one here - then THAT one won't look right. Erase. Erase. Erase. Now if I cut this one HERE - then THAT one will work better, but then the next one . . ."
Eventually, we got to the miter saw to cut the door panel parts to actual length - using the slip sticks to set a Stop for each length - since we wanted TWO of each panel - each cut from a different 1x10. As pairs of future door panels were cut they were marked using the Triangle Marking System. With six panels to keep track of - which goes with which, which side is up, which is Left and which is Right, which face is the Show Face - marking the parts, with an easy to do and easy to understand method saves a lot of confusion, and grief, later. MARK YOUR PARTS!