The Flip - Slide - Rotate - Shuffle Game (AKA grain figure/pattern matching parts layout)
The top of the cabinet was next. Went through my wood stash and of course -no surprise - The Kid really liked the birdseye maple boards I'd hidden towards the back of the stash. Got all eight of them out and onto the bench and he started the flip and slide and rotate and shuffle game of matching up boards to get what you need. To eliminate differences in shades due to exposure to light and air, we ran them all through the drum sanders taking off just enough to get down to fresh wood. More flip and turn and slide and shuffle.
Half an hour later - "This is like trying to put together an hour music set - this fits but then that doesn't. Move this over there and then that over there won't fit"
To spare him further grief I brought out one of the two 1/4" 4 x 8 sheets of birdseye maple ply I have (had) . $75 US a sheet but what the hell - he was really gettng into this Father Son Project and we were making memories not "just some record cabinets".
(note to reader: Every day we make memories, for ourselves and others. Why not shoot for making good memories?)
Taped two framing squares together to make a 15 x 24 "window" (the top's dimensions), some small Post Its to mark corners and went in the house to get lunch together.
"This is hard - not as hard as with eight boards shuffle but still hard."
"You could go with MDF and paint it."
"No way! This stuff's really nice! I want to make the front and back panels out of it too." (There goes all, or part of another sheet of my birdseye ply ...)
(There goes a sheet and a half of Birdseye maple)
"This stuff is only 1/4 inch thick. That's not going to be strong enough for the top."
"We'll glue it to a piece of 1/2 inch ply. Three quarters of an inch of ply will be plenty strong for the top."
"OK - but how do we hide the edges of the ply? Do they make a birdseye maple strip or something we can glue on the edges?"
"Not that I know of. But we can use some of one my precious birdseye maple boards to make a frame for the top and hide the ply edges. If we go with a rabbet for the ply to sit in it'll it'll work fine - though we'll have to do mitered corners."
"What's a rabbet?" ( groan )
"But that won't have the birdseye pattern on both the top edge and the front face."
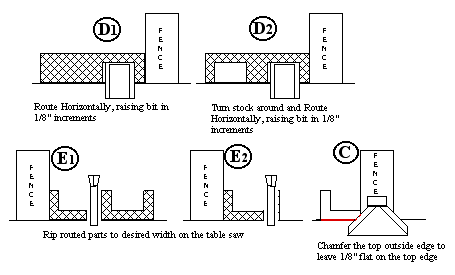
So we worked on that one for a while and Chas came up with chamfering the top edge to visually reduce the non- figured side grain when viewed from above. This is how it'd look and work .


Rip a one inch wide piece off a 3/4" birdseye board, on the router table, route the rabbet and then, using a chamfer bit,, route the chamfer. Simple enough right? WRONG! Here's why. Note the "tippy" problem with A & B.

So here's the alternative method that's a lot safer.

Next - The Kid gets to do the operations to make the parts.